Budget 3D Printed Quadcopter Build
/Immediately after building my first 3D printer I've wanted to 3D design and print my own quadcopter. It took a while but I finally got around to it. Turns out, it was surprisingly easy and I went from 3D designing to flying in a few hours. It took roughly 1 hour to design, 1 hour to print, 30 minutes to wire up, aaannnnd roughly 30 seconds of flying to crash and break my frame. I printed out a new frame and due to a transmitter setup error, promptly crashed and broke the flight control board, requiring a two week wait for a replacement... I finally got the bugs worked out and have been happily flying since!

If you’re new to 3D printing, pick3Dprinter.com has a very in depth guide of everything you need to become familiar and get started with 3D printing! To check that out, click on this link.
My main requirements for this project were cost and FlySky transmitter compatibility. I didn't want to have to buy a new $80+ transmitter. One bonus of using this flight control board and receiver combination is that it uses PWM so there are only 3 wires from the FCB to the receiver. Another bonus of using the FlySky protocol is that the cheap WLToys V939 transmitter available for <$20 is compatible and pairs with the FCB. That means the total would come to around $75 if you have absolutely no quadcopter hardware and that includes the transmitter, flight control board, receiver board, 4 motors, 4 batteries with a charger, and 10 pairs of propellers. I had the majority of the hardware on hand so it only put me out $25. See the bill of material below.

Transmitter
Motors 8.5x20mm
Propellers
Micro 32bits F3 Brushed Flight Control Board (TYPE B - 7 Channel + PWM)
DasMikro Ultra Miniature PPM Signal Output 8CH Receiver Board
Batteries and Charger
*If you plan on using these parts for your build, be mindful of the quantities. Some of the links above will include different amounts of the parts (Propellers, Batteries, Motors).

I use Autodesk 123D Design for my 3D modeling. It's free, fairly easy to use, and there are plenty of resources out there to help with the design process. When the parts arrived, I used my digital calipers to measure each component and drew them in 123D Design. This gave me a rough estimate of how large the center of my frame had to be and how I should lay everything out. I started drawing the design in 2D and then used the extrude function to turn my 2D sketches into the 3D model. I added tie down holes and posts for mounting the components and small indents on the motor mounts for the motor wires. I added a couple of additional support bars after my first two crashes resulted in broken arms. I saved the project as an .STL file, ran it through Slic3r, and was ready for printing.

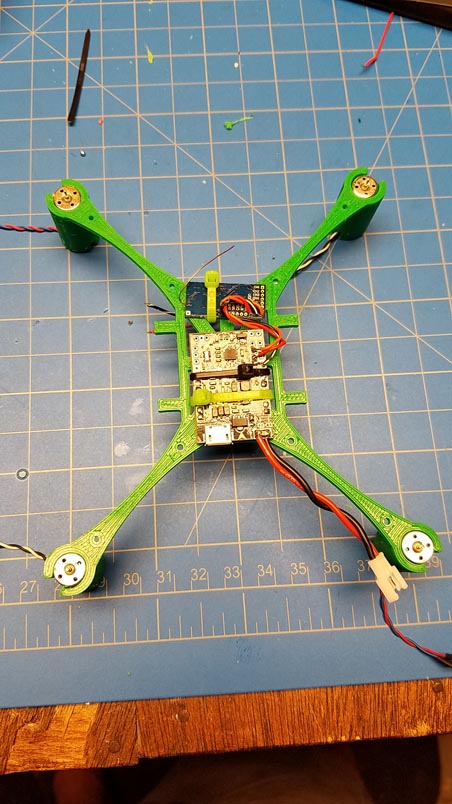
Once the design was finished, it was time to print out the quadcopter frame. I used PLA because I find it easier to work with and have a bunch on hand. While the frame is printing, the flight control board and receiver can be prepared. Depending on which vendor you buy the motors from, they may or may not come with the white connectors already attached. If your motors have the white plugs, the supplied female receptacles can be soldered in place on the flight control board as well as the supplied battery plug connector. Then, three short wires can be soldered from the PWM channels of the receiver board to the flight control board.


Once the frame was printed out, the flight control board and receiver can be zip tied in place. Next the motors were mounted and wired up. I used a dremel to clean up the insides of the mounts. These are pressure fit mounts so it will take a bit of force to get them to slide into place, and any artifacts from the printing process may make it more difficult to seat the motors. Once in place, I added a small bit of hot glue to keep them from slipping. Be mindful of the polarity when wiring up the motors. Lastly, I used a rubber band as a simple battery mount. The white arrows on the flight control board indicate which direction is forward. The Cleanflight settings for PWM communication are included below. Once I had every set up, I installed the propellers per the Cleanflight diagram. My model file is available on thingiverse: http://www.thingiverse.com/thing:2051494


I put off this project for months because it seemed like a lot of work. In reality, most of the work was in the part research. Once I had a working set of electronics, the rest came relatively easily. The actual design, printing, wiring, and flying were extremely simple and fun. I highly recommend anyone with a 3D printer and an interest in quadcopters to give this a try!
